What Is a CNC Macro? — Start Here
If you can write G-code, you already have everything you need to start writing macros. A macro is just G-code that can do math, remember values, make decisions, and repeat itself—so one short program can do the work of hundreds of hand-typed lines. This page is the on-ramp: it starts from zero, builds up the four ideas that make a macro work, and finishes with a complete, runnable first macro you can change and re-run. When you want the full reference on any piece, follow the links along the way.
What Is a Macro?
A macro (Fanuc calls it a Custom Macro B) is a CNC program that uses variables, arithmetic, and logic in place of fixed numbers. A normal program says “go to X2.5, Y1.0.” A macro can say “go to whatever X and Y I just calculated,” or “repeat this move until the counter reaches the number of holes.”
A macro looks and runs like an ordinary program. It is stored under an O-number, it uses the same G- and M-codes you already know, and it ends with M30 or M99. The only new thing is that some of the values are computed instead of typed. That single change unlocks a surprising amount of power:
| Macros let you… | Which means… |
|---|---|
| Store and reuse values in variables | Change one number at the top and the whole program follows |
| Do arithmetic and trigonometry | Let the control calculate hole positions, feeds, and pass counts |
| Make decisions (IF) | Skip a step, validate an input, or pick a branch based on a value |
| Loop (WHILE) | Repeat a move any number of times without copy–paste |
| Read the machine's own data | Use real spindle load, probe results, and offsets inside the program |
Those features are what make macros the tool of choice for families of parts (one program, many sizes), probing and in-process gauging, and custom canned cycles that behave like built-in G-codes.
Why Bother? A Before & After
The clearest way to feel the difference is to drill the same ten holes two ways. Say you need ten holes on a line, one inch apart, starting at X0. Done by hand, that is ten near-identical blocks:
(THE HARD WAY - TEN HARD-CODED HOLES)
G81 X0.0  Y0.0 Z-0.5 R0.1 F10.
X1.0
X2.0
X3.0
X4.0
X5.0
X6.0
X7.0
X8.0
X9.0
G80
It works—until the customer asks for twelve holes, or 0.75” spacing, or a different depth. Now you are hand-editing every line. Here is the same job as a macro loop:
(THE MACRO WAY - A LOOP THAT DRILLS N HOLES)
#100 = 0                       (HOLE COUNTER, START AT 0)
WHILE [#100 LT 10] DO1         (REPEAT WHILE COUNTER IS BELOW 10)
G81 X[#100 * 1.0] Y0.0 Z-0.5 R0.1 F10.
#100 = #100 + 1              (NEXT HOLE)
END1
G80
Same result, five lines. Want twelve holes? Change 10 to 12. Want 0.75” spacing? Change 1.0 to 0.75. The program re-computes every position for you. That is the entire pitch for macros: describe the pattern once, and let the control fill in the numbers. The rest of this page explains the four ideas that make that loop work.
Idea 1 — Variables (the # Numbers)
A variable is a labeled box that holds one number. In Fanuc macros a variable is written as a # followed by a number that names the box—#100, #500, #1. You put a value in with = and read it back just by writing its name:
#100 = 2.5        (PUT 2.5 INTO BOX #100)
G01 X#100 F10.    (MOVE TO X2.5 - THE CONTROL READS THE BOX)
#100 = #100 + 1   (NOW BOX #100 HOLDS 3.5)
The number after the # is not the value—it is the address of the box. Fanuc groups those addresses into a few classes, and the class tells you how long the value survives and who else can see it:
| Range | Class | What it's for |
|---|---|---|
#1 – #33 | Local | Receive arguments from a G65 call; private to one macro, cleared when it returns |
#100 – #199 | Common (volatile) | Scratch values shared across programs; cleared at power-off |
#500 – #999 | Common (permanent) | Shared values that survive power-off—counters, calibration, probe results |
#1000 and up | System | The machine's own data—positions, offsets, alarms, modal state |
For your first macros, reach for the common variables (#100–#199) as scratch space. There is one gotcha worth knowing on day one: a variable that has never been given a value is null (empty), which is not the same as zero. A null X#100 is skipped entirely; a zero X#100 moves to X0. That distinction is the single most common source of macro bugs.
Full details on every class, persistence, and the null-vs-zero rules: Variable Types.
Idea 2 — Arithmetic & Functions
Once values live in variables, you can compute with them. Macros support ordinary math plus a library of functions. Here are the ones you will use first:
| Operation | Writes as | Meaning |
|---|---|---|
| Add / subtract | #1 + #2 #1 − #2 | Sum and difference |
| Multiply / divide | #1 * #2 #1 / #2 | Product and quotient |
SIN / COS | SIN[#1] COS[#1] | Sine / cosine (angle in degrees) |
SQRT | SQRT[#1] | Square root |
ABS | ABS[#1] | Absolute value (drop the sign) |
ROUND | ROUND[#1] | Round to the nearest whole number |
Two rules that trip up beginners: macros use square brackets [ ] for grouping, because parentheses ( ) are reserved for comments; and the trig functions work in degrees, not radians. So a right-triangle leg is #101 = #1 * COS[30], and forcing addition before multiplication looks like #100 = [#1 + #2] * #3.
#100 = [#1 + #2] * #3     (BRACKETS FORCE THE ADDITION FIRST)
#101 = SQRT[#1 * #1 + #2 * #2]  (HYPOTENUSE)
#102 = ROUND[#1 / #2]     (RPM AS A WHOLE NUMBER)
The full operator list, precedence, rounding modes (ROUND/FIX/FUP), and trig notes: Macro Arithmetic.
Idea 3 — Control Flow (Decisions & Loops)
Control flow is how a macro decides what to do next. You need just two forms to start.
IF / GOTO tests a condition and, if it is true, jumps to a line label (an N number). Conditions use two-letter operators: EQ (equal), NE (not equal), GT (greater), LT (less), GE, LE.
IF [#100 GT 10] GOTO 50    (IF #100 IS OVER 10, JUMP TO N50)
(... code that runs when #100 is 10 or less ...)
N50 (... code that runs when #100 is over 10 ...)
WHILE / DO repeats a block while a condition stays true. The loop is tagged with a number (DO1…END1), and you can nest up to three levels. This is the workhorse—it is exactly what powered the ten-hole loop above:
#100 = 1                   (COUNTER)
WHILE [#100 LE 5] DO1      (REPEAT WHILE COUNTER IS 5 OR LESS)
(... do something five times ...)
#100 = #100 + 1          (ADVANCE THE COUNTER - DON'T FORGET THIS!)
END1
The most common beginner mistake is forgetting to advance the counter inside the loop—without #100 = #100 + 1, the condition never becomes false and the loop runs forever. The complete reference on branching, compound conditions, and nesting: Macro Control Flow.
Idea 4 — Passing Values In with G65
The examples so far set their values at the top of the program. The real power comes when you store a macro once and hand it different values each time you call it. That is what G65 does. It calls a macro program by O-number and passes in values through letter addresses:
G65 P9101 A1.5 B-0.5 C6 D0. F10.
|    |    |  |   |
A    B    C  D   F    ← letter arguments, each lands in a variable
Inside the called macro, each letter arrives in a fixed local variable. You read the values as #1, #2, #3… instead of the letters. The first several map like this:
| Letter | Variable | Letter | Variable |
|---|---|---|---|
| A | #1 | D | #7 |
| B | #2 | F | #9 |
| C | #3 | Z | #26 |
So G65 P9101 A1.5 lands as #1 = 1.5 inside O9101. A few letters (G, L, N, O, P) are reserved and cannot be arguments. The complete A–Z mapping, the second (I/J/K) argument style, and G65 vs M98: Argument Variables.
Your First Complete Macro
Now let's put all four ideas together in the classic first project: a bolt-hole circle—a set of holes evenly spaced around a circle. This is the “hello world” of macro programming because it needs variables, trig, and a loop, and because doing it by hand means looking up sines and cosines for every hole.
Here is a self-contained version you can run as-is. The values live in variables at the very top, so you set the pattern in one place. Drill it, then change one number and watch it re-compute.
O0001 (BOLT HOLE CIRCLE - FIRST MACRO)
(--- SET THE PATTERN HERE ---)
#100 = 2.0        (BOLT CIRCLE RADIUS)
#101 = 6          (NUMBER OF HOLES)
#102 = 0.         (STARTING ANGLE, DEGREES)
#103 = -0.5       (HOLE DEPTH)
(--- NOTHING BELOW NEEDS TO CHANGE ---)

G90 G54 G17 S1500 M03      (ABSOLUTE, WORK OFFSET, XY PLANE, SPINDLE ON)
G00 Z1.0 M08               (RAPID TO CLEARANCE)

#104 = 360 / #101          (ANGLE BETWEEN HOLES)
#105 = 0                   (HOLE COUNTER, START AT 0)

WHILE [#105 LT #101] DO1               (REPEAT ONCE PER HOLE)
#106 = #102 + #105 * #104            (ANGLE OF THIS HOLE)
#107 = #100 * COS[#106]              (X = RADIUS * COS[ANGLE])
#108 = #100 * SIN[#106]              (Y = RADIUS * SIN[ANGLE])
G81 X#107 Y#108 Z#103 R0.1 F8.       (DRILL AT THE COMPUTED POINT)
#105 = #105 + 1                      (NEXT HOLE)
END1

G80                        (CANCEL DRILL CYCLE)
G00 Z1.0 M09               (RETRACT, COOLANT OFF)
G28 Z0.                    (HOME Z)
M30                        (END)
%
Reading it line by line:
| Line(s) | What it does |
|---|---|
#100–#103 | Variables (Idea 1). Four boxes hold the whole pattern: radius, hole count, start angle, depth. This block is the only part you edit. |
#104 = 360 / #101 | Arithmetic (Idea 2). Divide the full circle by the hole count to get the spacing angle. Six holes → 60° apart. |
#105 = 0 | Start the hole counter at zero. |
WHILE [#105 LT #101] DO1 | Control flow (Idea 3). Repeat the body once for each hole—while the counter is less than the hole count. |
#106 = #102 + #105 * #104 | The angle of the current hole: the start angle plus (this hole's index × the spacing angle). |
#107, #108 | Convert that angle into X and Y with cosine and sine—the trig you would otherwise look up by hand for every hole. |
G81 X#107 Y#108 … | A normal drilling cycle—except X and Y are the values the macro just computed. |
#105 = #105 + 1 | Advance the counter so the loop eventually ends. Miss this line and it drills the first hole forever. |
END1 → M30 | Close the loop, retract, home, and end. |
Now change one number. Set #101 = 8 and the same program drills eight holes, each 45° apart, all positions recomputed for you—no new coordinates to type. Change #100 to move to a bigger circle, or #102 to rotate the whole pattern. That is the payoff: you described the pattern once, and the numbers take care of themselves.
The natural next step is to turn the four values at the top into G65 arguments, so the macro lives in memory and you call it with G65 P9101 A2.0 C6 … for any bolt circle on any job. That—plus rectangular pockets and other families of parts—is covered in Parametric Programming. To make a macro run like a built-in G-code (so operators type G100 and never see the macro), see Custom G/M Cycles.
How Other Controls Do Macros
The ideas on this page—variables, math, loops, passing arguments—are universal. What changes between control brands is the spelling. If you already think in Fanuc #-variables, here is how the same concepts translate:
| Control | Variables look like | Call / functions |
|---|---|---|
| Fanuc / Haas / Mazak / Mitsubishi | #100, #500 (#-variables) | G65 P____ with letter arguments |
| Siemens SINUMERIK | R0–R99 (R-parameters), $-system variables | Program call with parameters — see Programming Basics |
| Heidenhain (Klartext) | Q1, Q2… (Q-parameters) | FN functions (FN0, FN1…) — see TNC 640 Q-Parameters |
| Okuma (OSP) | Common variables V1–V200, VC1… | User task / call — see Okuma Variable Types |
Learn the concepts on one control and they carry over to all of them—you are mostly re-learning names and punctuation, not ideas.
Where to Go Next
You now have the whole picture: a macro is G-code with variables, math, decisions, and loops, called and fed with G65. From here, go deeper on whichever piece you need—Variable Types, Macro Arithmetic, Macro Control Flow, Argument Variables, and Macro Structure—then put it to work with Parametric Programming.
▶ Open the Macro Playground — write and run your first macro in the browser and watch the variables update live.
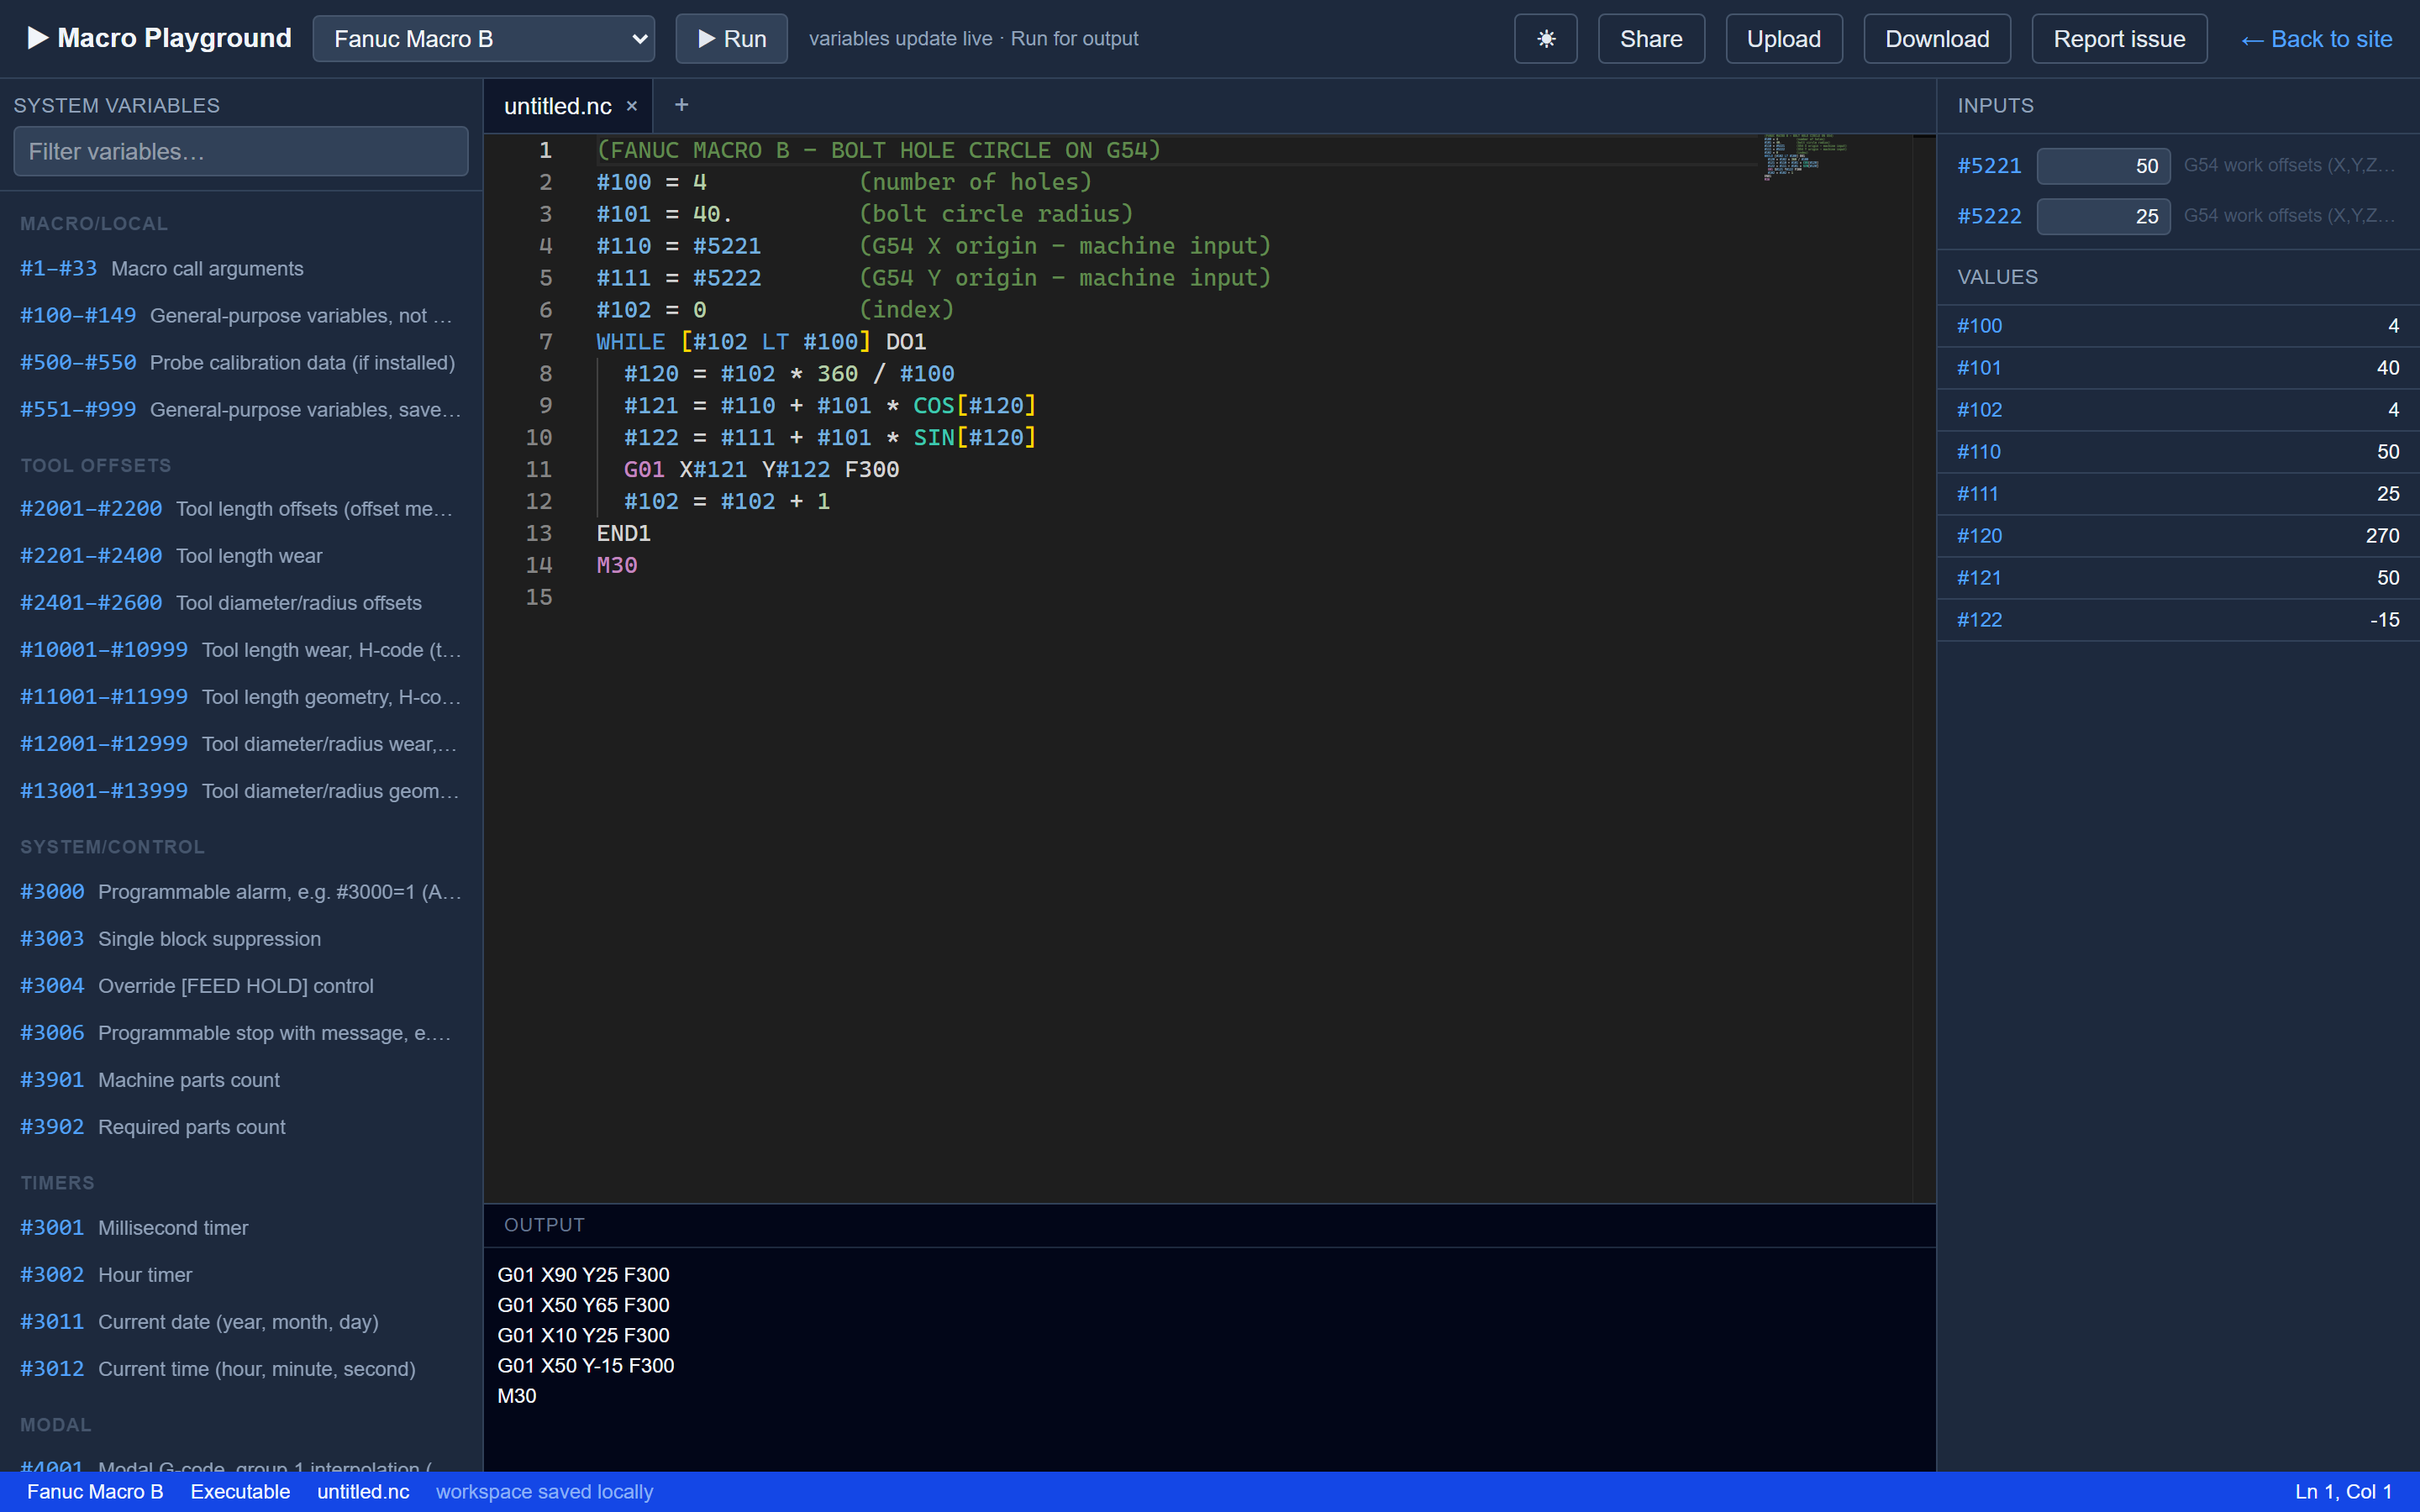
The bolt-circle macro from this article running in the Macro Playground — inputs like #5221 on the right feed the program, and every variable updates live as it runs.
References
- Peter Smid, Fanuc CNC Custom Macros, Industrial Press, 2004.
- Fanuc, Operator’s Manual / Parameter Manual, FANUC Corporation.
Have a question or want to contribute?
Contact us with corrections, additions, or topics you'd like covered.
Get in Touch